Sprite Sizing
We need to draw our sprites at such a size that they look good natively at 4k and do not need to be scaled up.
The most zoomed in that the game will be is 5 grid spaces high, and we will use this to determine how big to draw our sprites.**
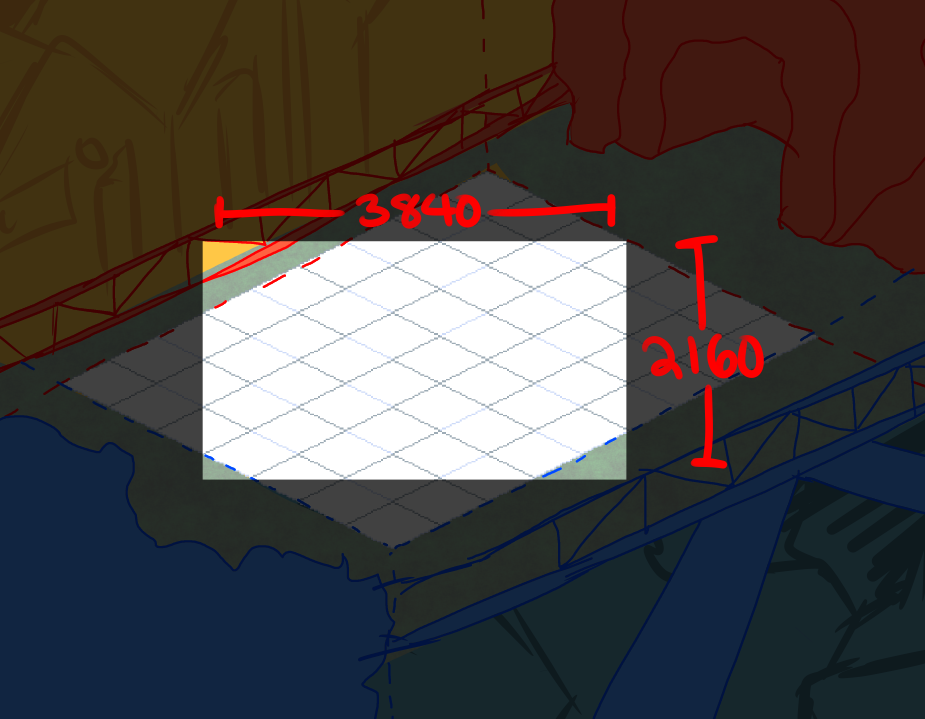
4k resolution is 3840x2160px, so if we divide that height by 5 grid spaces:
2160 / 5 = 432px.
Therefore, if our unit of measurement is grid spaces, we know that each gridspace is about 432px high. We will use this as our scale for our sprites.
Here is an approximate sizing chart for each of our player characters:
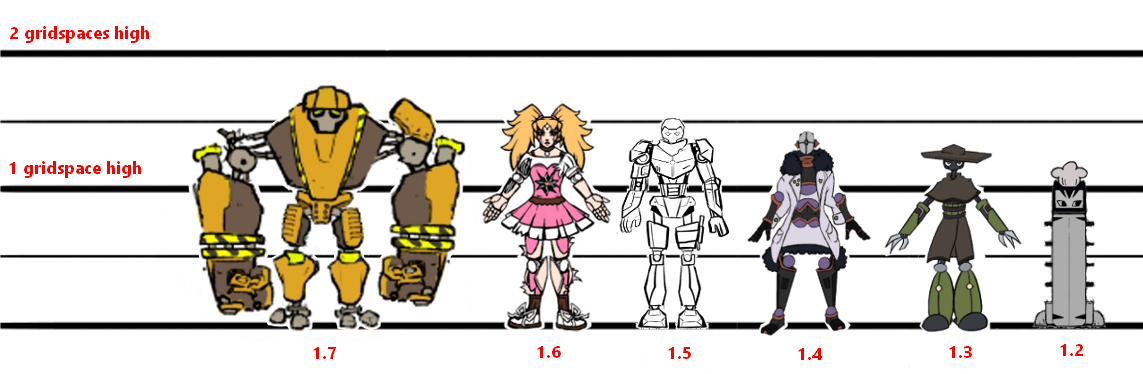
Here are some approximate heights that the sprites for each player character should be. (calculated from the above grid and rounded)
Doesn’t have to be exact, but when assembled and tweened, the sprites should be about this tall.
-
Construct → 735px
-
Idol → 690px
-
Bandit → 650px
-
Hacker → 605px
-
Keeper → 560px
-
Neko → 520px
All player characters’ widths should fit inside the grid space, so ensure they are no wider than about 860px.
Creating Rigs
If you run into troubles, try looking at the Errors + how to fix section!
-
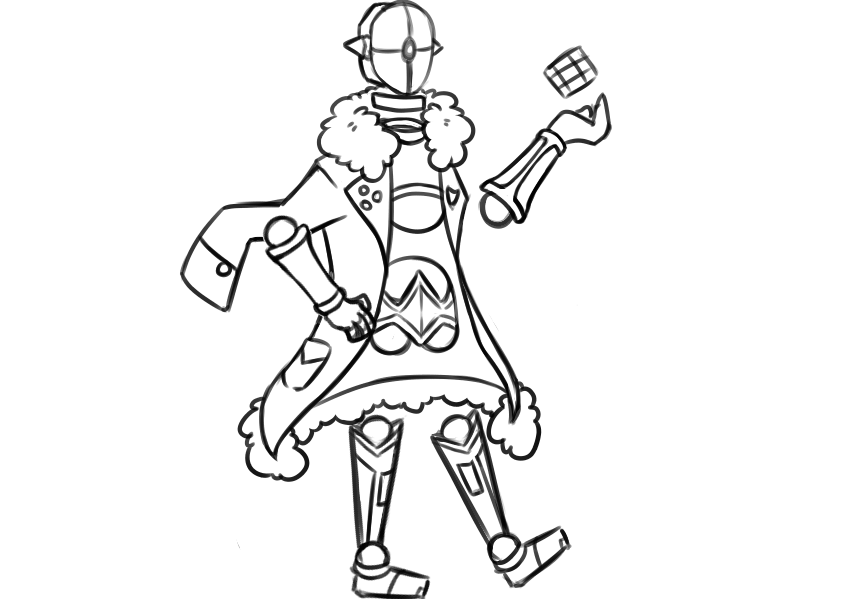
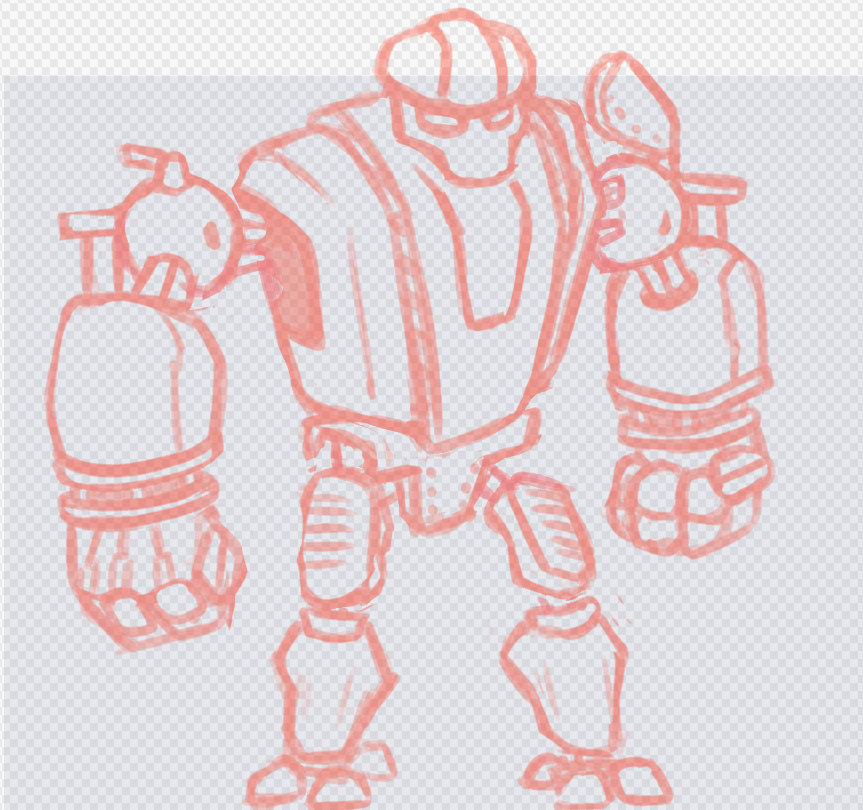
First, sketch out your pose of how the character will sit when idle. We are going to use this to figure out how to break down our sprites.
-
Make sure you read the GDD for your character, so you can understand what sorts of animations this rig is going to need to be able to do.
-
This will also let you plan ahead to determine if you’re going to need to draw extra sprites to swap out. (This will decrease the workload for the animators so they dont need to draw any extra sprites)
-
Draw the character facing to the RIGHT
-
-
While you are drawing, and when you are done, think about how you are going to need to split up your drawing into different sprites.
-
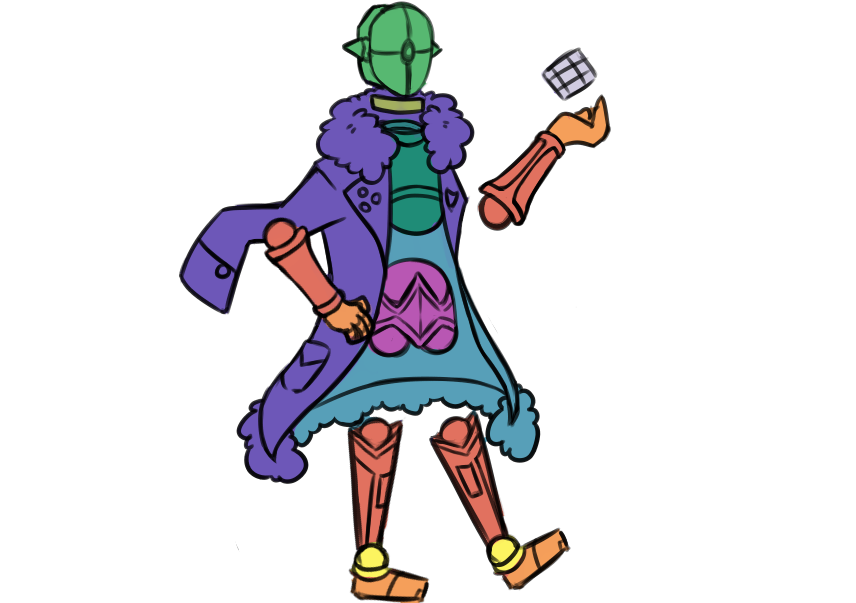
Below is my own example, we will see how accurate it is when I’m done.
-
Then, straighten out your character so they are standing up straight and in either a T-pose or A-Pose
-
Below is an example with my intended idle pose for Construct, vs the pose that I have been drawing them in for rigging purposes:
-
I had to make the canvas taller to accommodate for them standing up straight, but this is fine because the intended idle pose will still be the correct height when we position them later in-engine
-
I went with more of an A-Pose here for construct, compared to the T-Pose I used for Hacker, as the character is so large.
-
I would still recommend a T-Pose where possible.
-
Now draw your sprites and break them down into the body parts! You’ll likely find that there are more things to consider than you initially realised, and that you’ll end up with more separate pieces.
-
Use a regular plain round brush that has a size of 5.
-
Pressure sensitivity for sizing is fine, but not opacity
-
Try to keep most of the lines consistent
-
-
Watch your colours- colour pick once from the reference image, and put these colours onto your canvas. Because otherwise, image compression means that when you colour pick from the reference photo the colours may be slightly different each time.
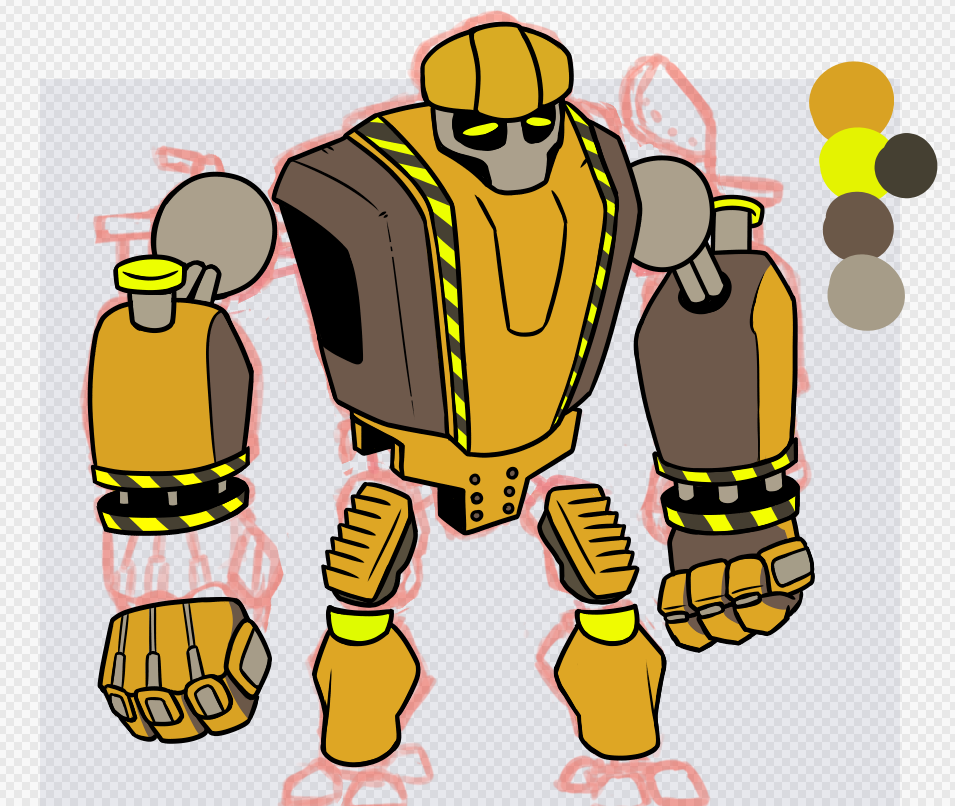
Also, position your sprites in an A or T pose, not the relaxed idle pose that you drew beforehand. (Draw it in this pose as well! Don’t draw an arm piece and then rotate into a T-pose because your sprites will be blurred.)
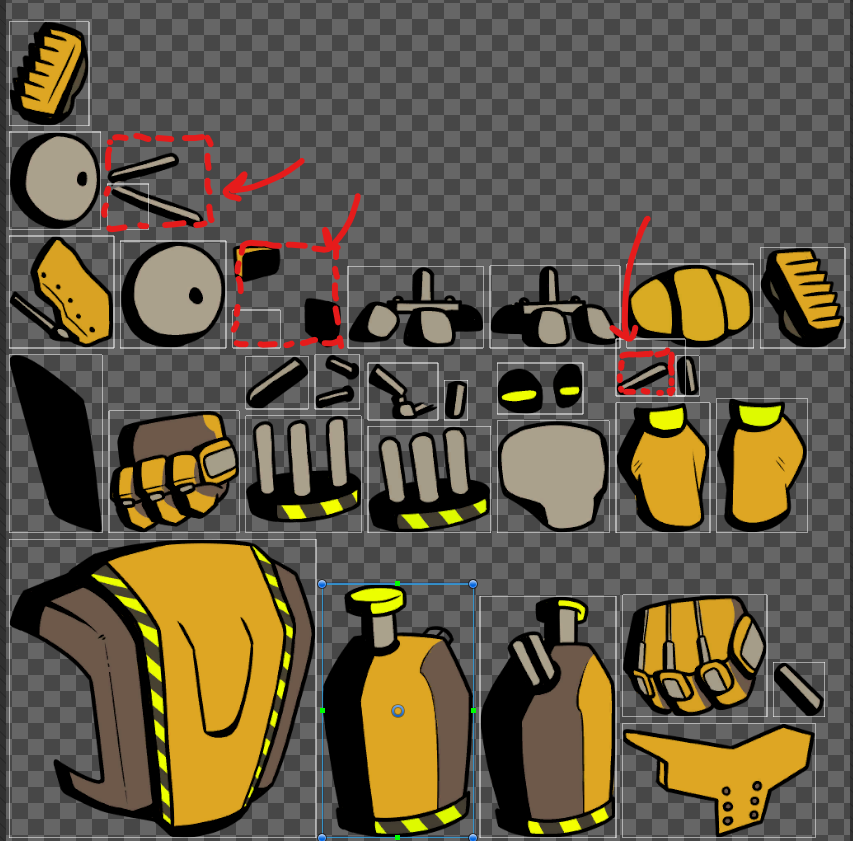
Here’s what I’ve ended up with, with an additional showcasing of how many separate sprites there are! (Hacker is complicated.) It is possible that i might need to break that red coat sprite into two separate pieces, but we’ll see later.
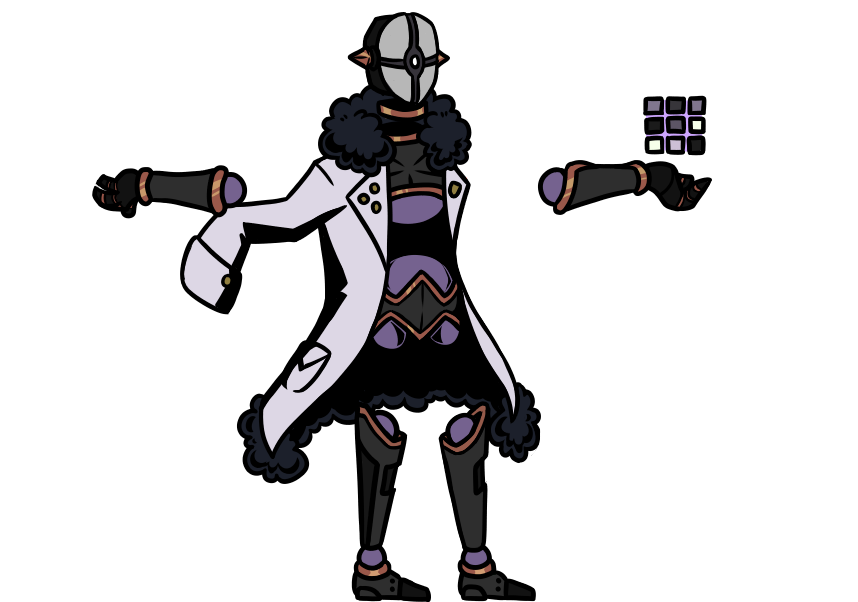
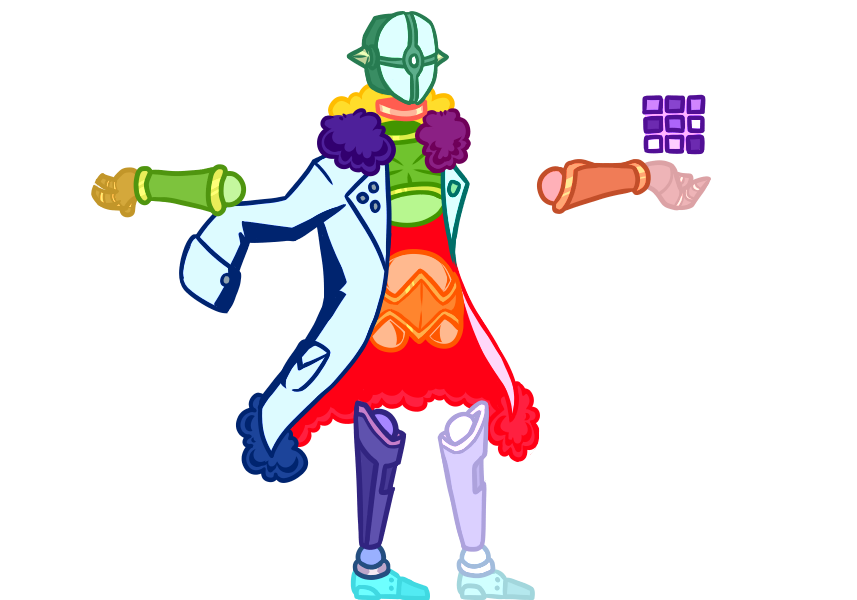
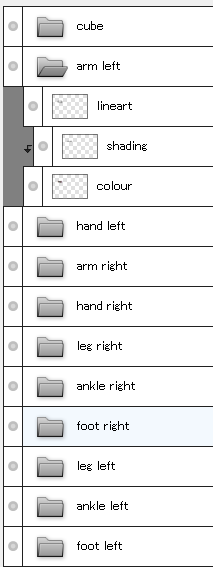
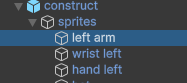
Separate all your parts into folders, and make sure you name the folders. (individual lineart and shading layers dont NEED to be named, but you can if you want to. You just need to make sure the folders are named)
Then you will need to export your file as a .PSD, so make sure your drawing program supports you being able to do this!
Setting up rig in unity
-
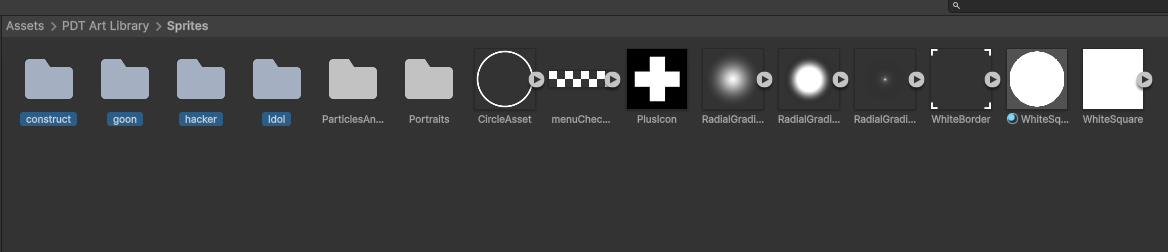
Drag in your psd file into our Sprites folder in Unity
-
Create a new folder in the Sprites folder, and name it after the character! This is where we will hold the sprites + our sprite library + any skin variations down the line
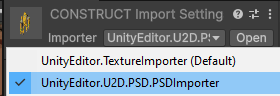
- Click on it and set the importer to the PSD importer
-
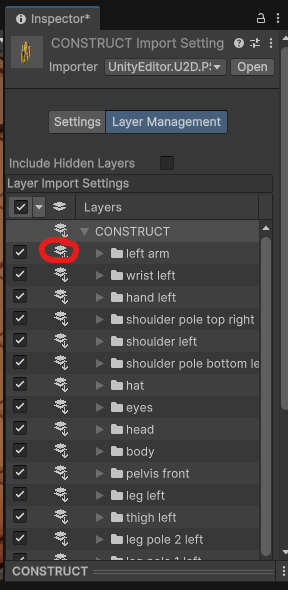
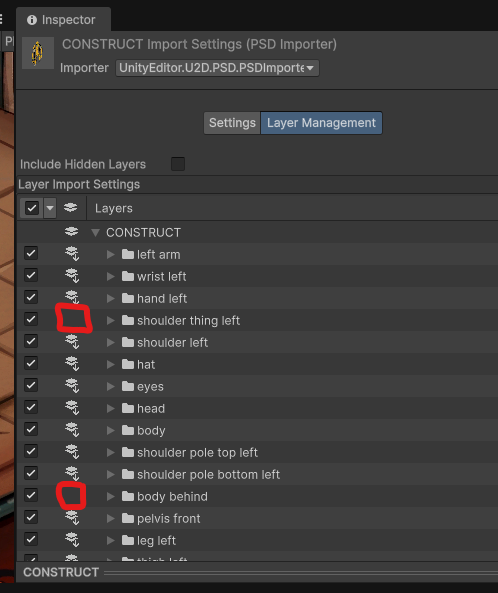
Click on the Layer Management tab
-
Uncollapse all the layers so you can see all your layer folders
-
Turn on layer merging for each folder (this will make sure that the colour, lineart and shading are merged into one object for each piece)
-
Make sure “Include Hidden Layers” is NOT enabled
-
Scroll down to the bottom and click Apply
-
-
Go back to the Settings tab
-
Under the Layer Import tab
-
Set the Import Mode as “Individual Sprite”
-
Set the Layer Mapping as “User Layer Name”
-
-
Under the Advanced tab
- Make sure “Generate Mip Maps” is turned OFF
-
Scroll down and press “Apply” (if you need to)
-
-
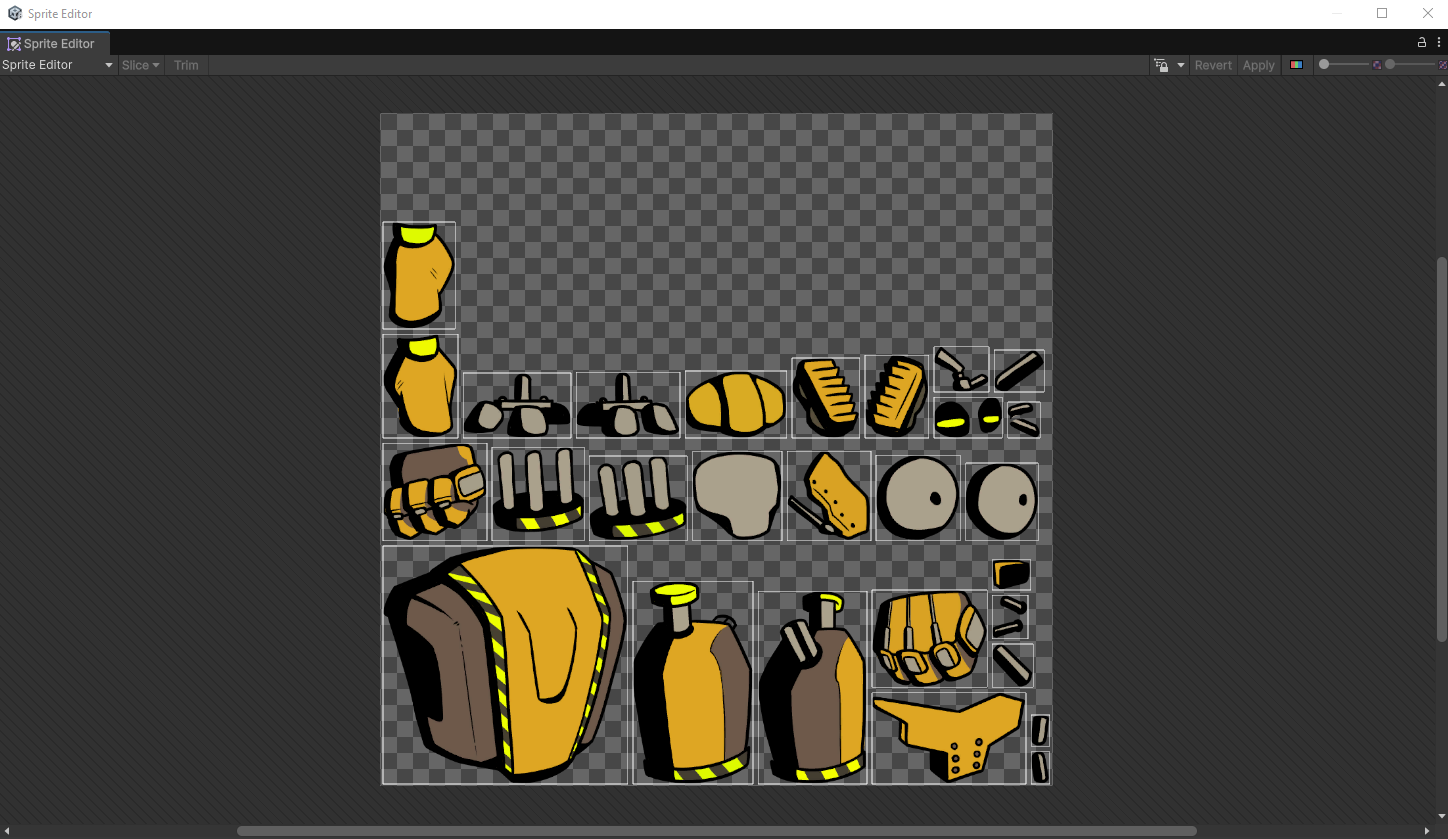
Click the “Open Sprite Editor” button. If you’ve done everything correct so far, you should see all your pieces laid out like this :)
-
It’s time to create some bones!
-
This video was kinda helpful with getting me to learn how to do the bones
-
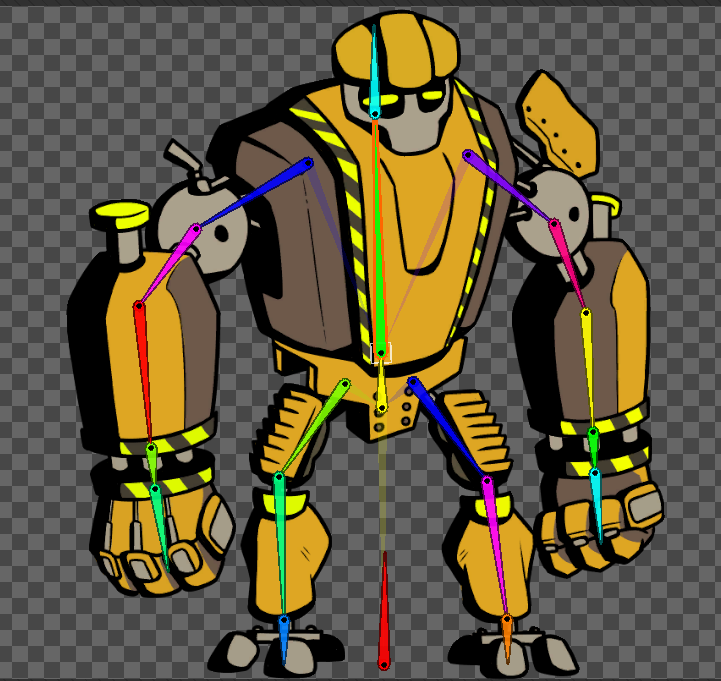
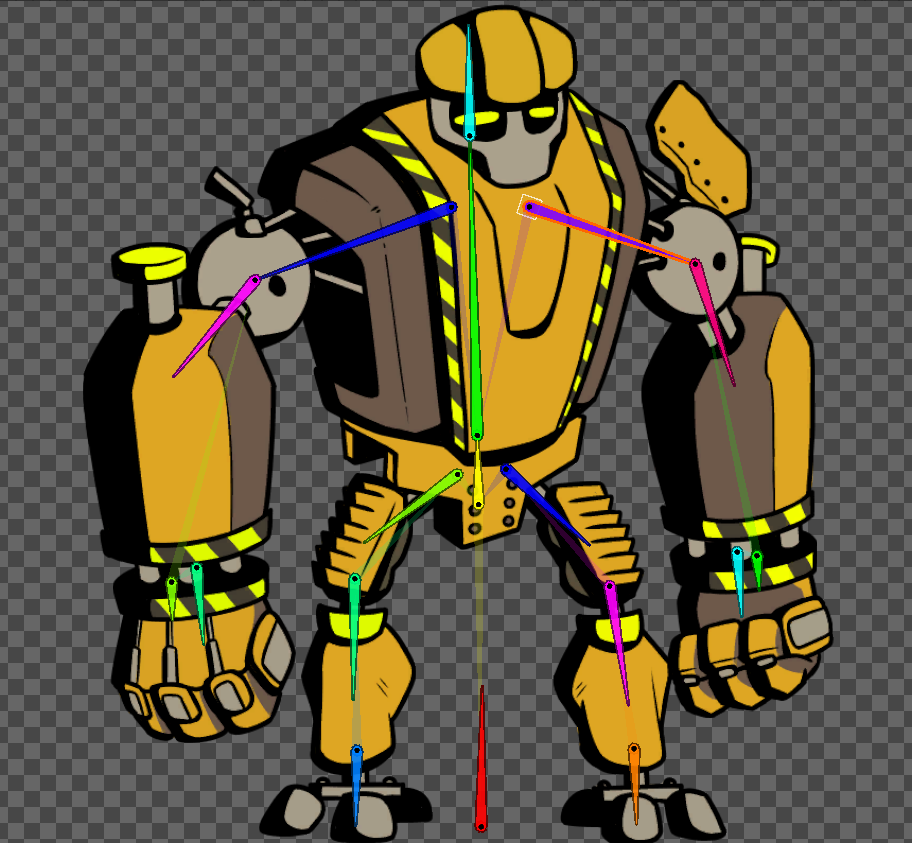
Make sure you go back and name your bones!!
-
Here’s what my bones looked like initially vs what I ended up with for my final product.
-
-
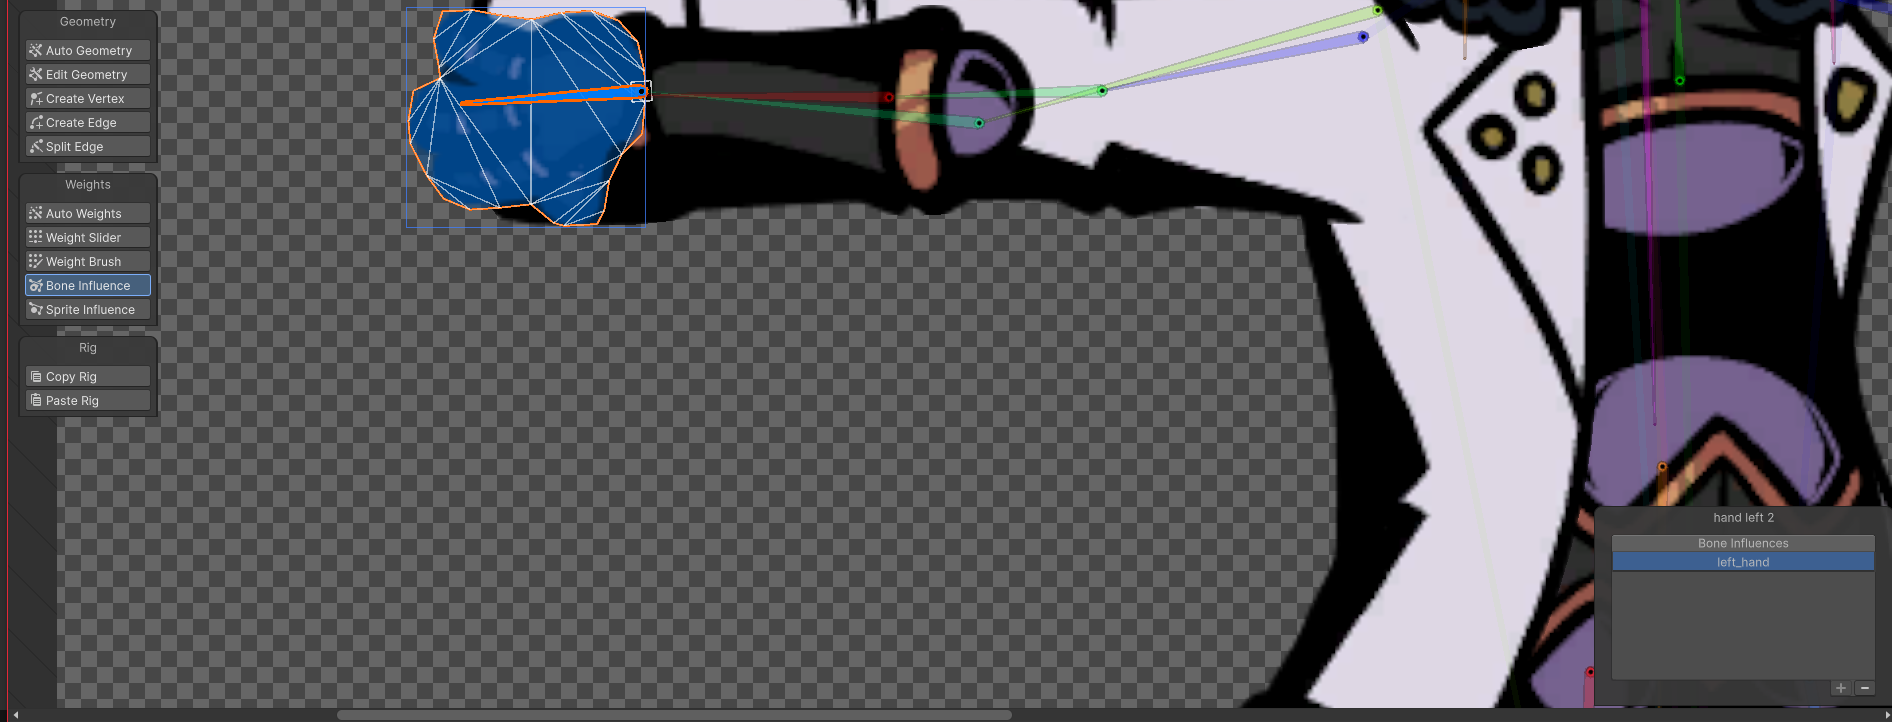
Setting Bone Influences
-
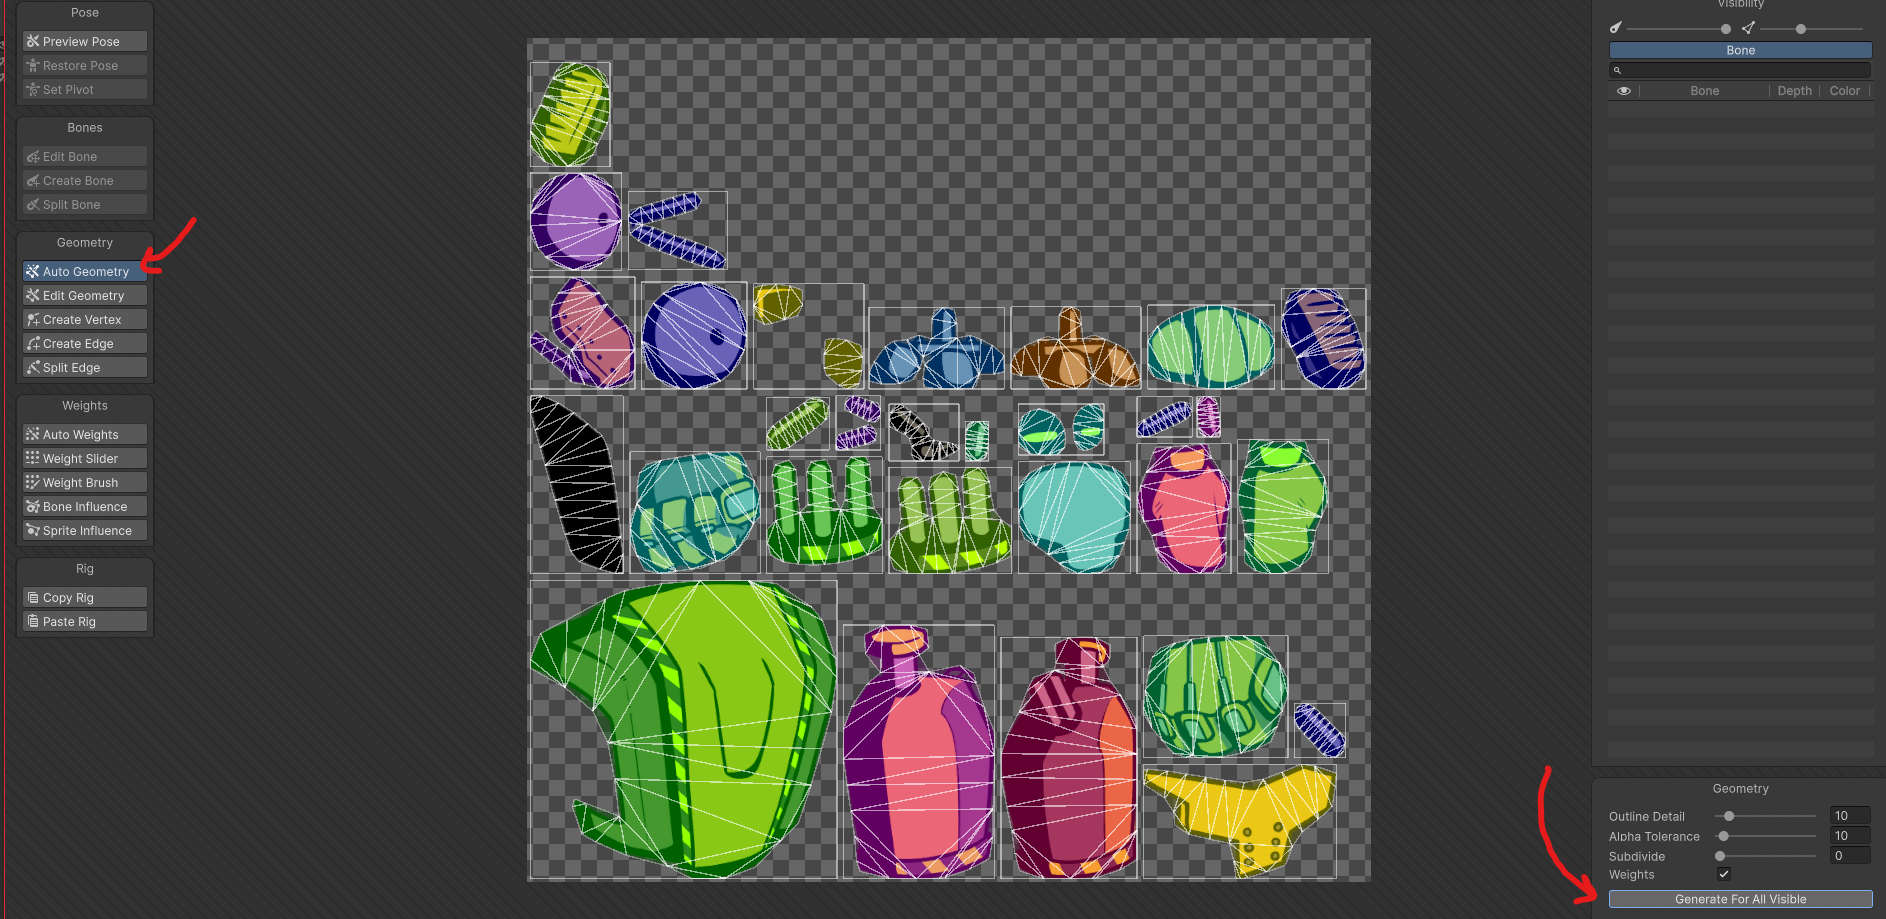
Press the “Auto Weights” button, and check the “Associate bones” button. Then press “Generate All” which will automatically try and generate which bone moves each sprite.
-
If you press the “Preview Pose” button, and try to position the bones, you’ll see your sprite moves!
-
It won’t be entirely accurate though, and we’ll need to clean it up. You’ll likely notice that moving a bone is effecting sprites that you don’t want it to.
-
-
You can do it one of two ways; by sprite or by bone. It’s a matter of preference because they both achieve the same thing. I personally find it easier to do it by sprite.
-
By sprite - press the “Bone Influence” button
-
Select a sprite, eg. the right foot
-
In the bottom right hand corner, you’ll see a list of bones that influence that sprite
-
Remove anything that shouldn’t be there (and add anything which is missing)
-
For example, I need to remove the ‘shin right’ bone, because only the foot bone should be impacting my foot
-
-
-
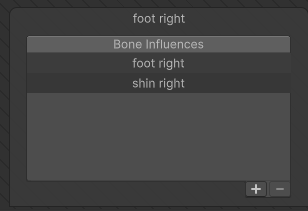
-
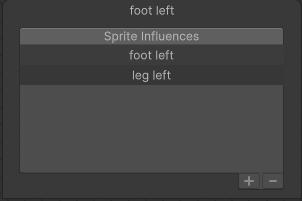
- By bone - press the “Sprite Influence” button
- Click one of your bones, eg. the left foot bone
- In the bottom right hand corner, you’ll see a list of sprites that are influenced by this bone
- Remove anything that shouldn’t be there (and add anything which is missing)
- For example, I needed to remove the ‘leg left’ sprite, because it shouldn’t be moved when i move my foot bone.
-
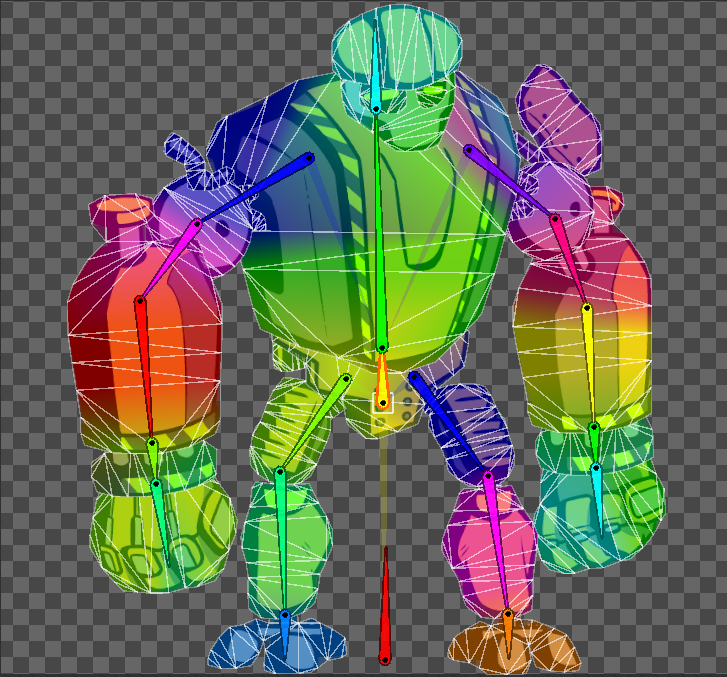
Here’s what the bone influences looked like initially vs what I ended up with. As construct is all mechanical and I dont want any of the pieces to be controlled by multiple bones, you can see that they are all solid colours.
-
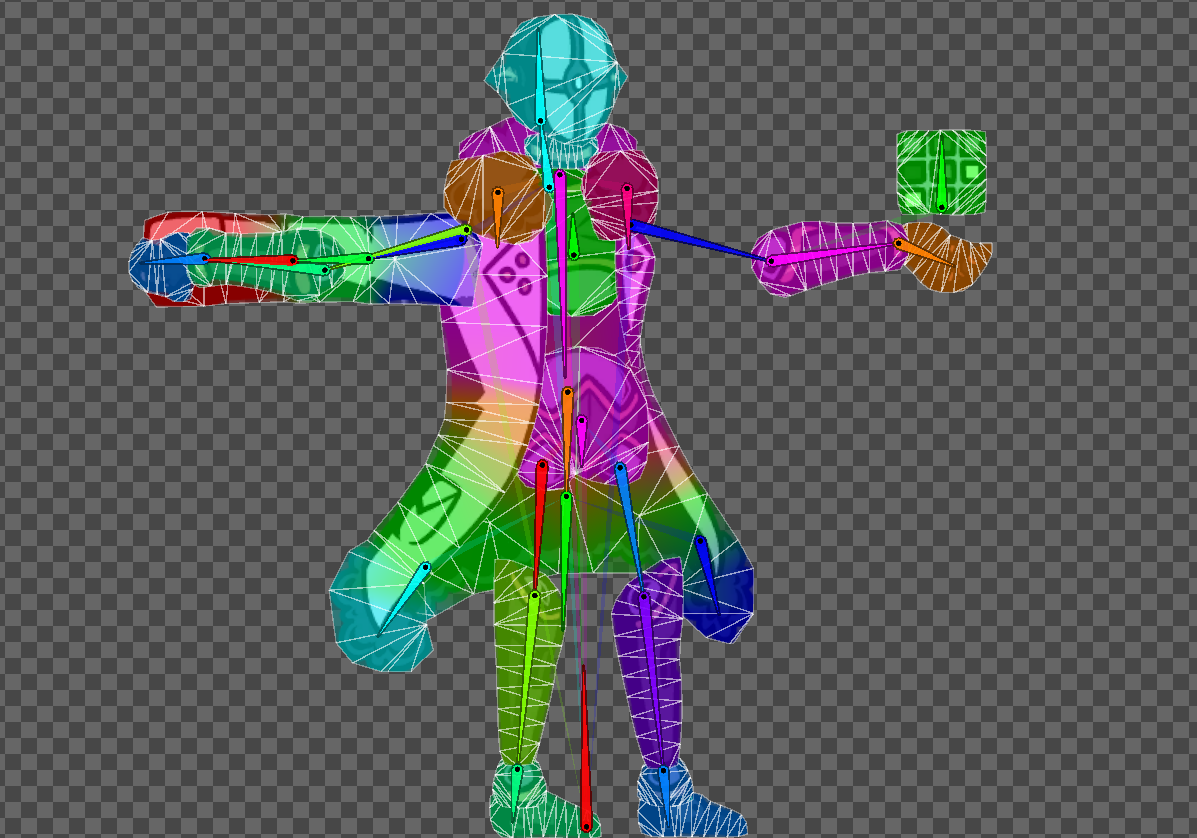
Compare this with my hacker rig, which looks more scary in comparison, you’ll see that the cloak is multicoloured because its being influenced by a few bones.
- If you need something like that on your rig, ping me for help with weight painting because it’s a bit hard to explain otherwise.
-

I’d recommend you stop here and go bother Lauren for her to check your rig and see how it’s going! Especially if it’s your first time making a rig, theres a few little things that can be missed on first glance.
-
Time to add some inverse kinematics to the limbs!
-
This video might help more than my text
-
This will make it way easier to pose out limbs.
-
Drag your sprite out of the sprite folder and into our test scene
-
Click on the guy and then add an IK Manager 2D Component!
-
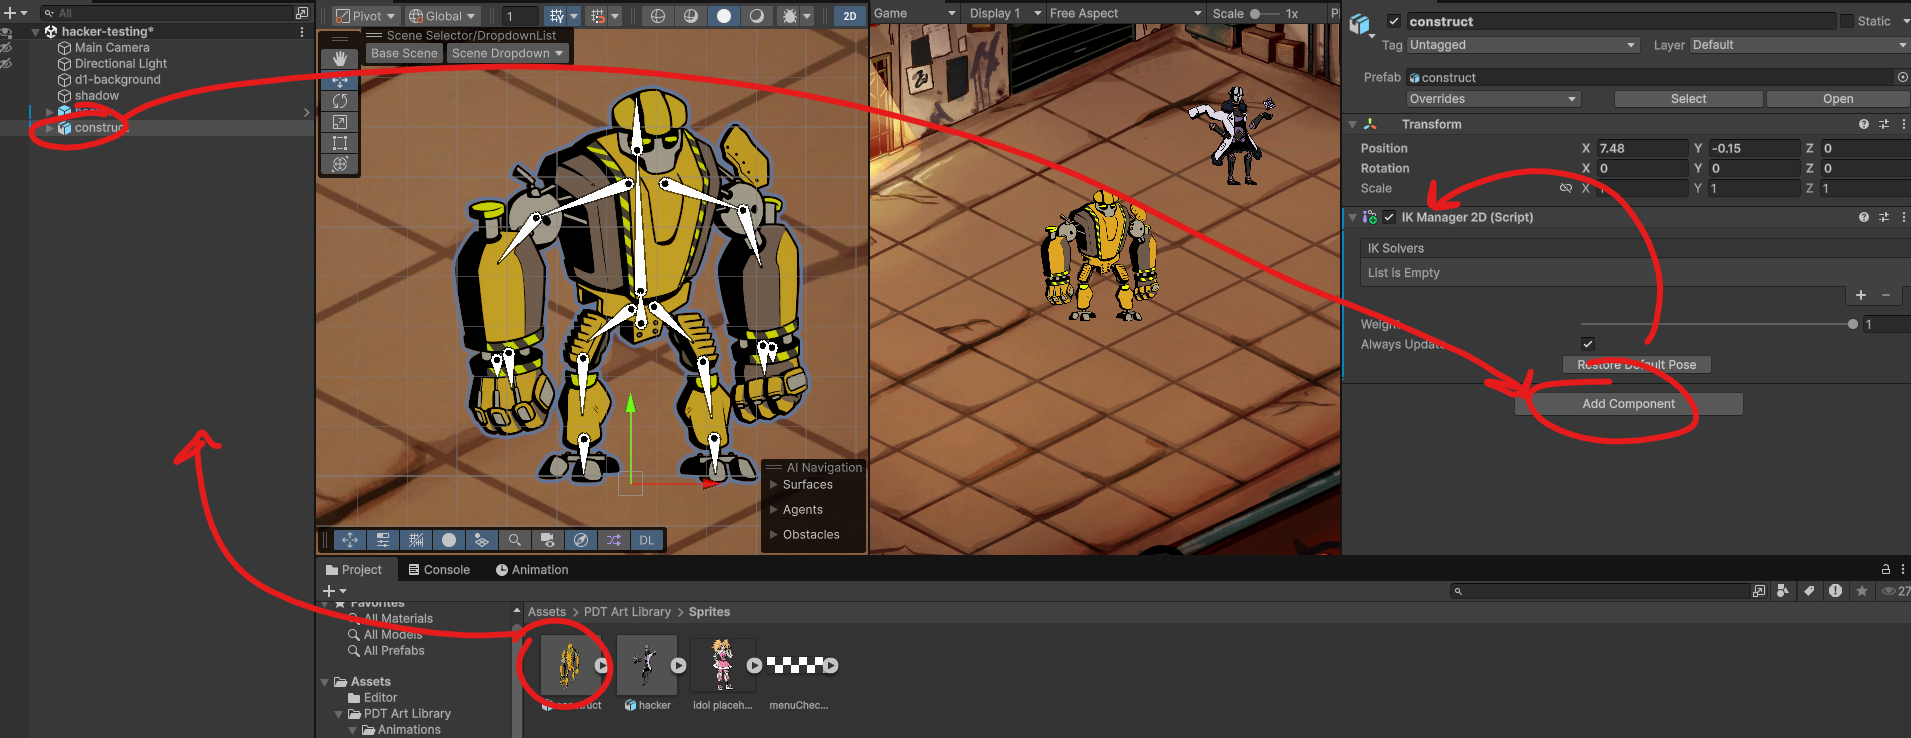
-
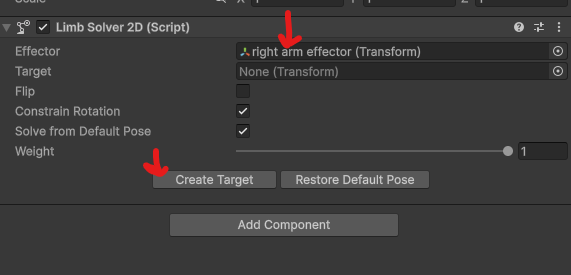
Add a new Limb IK solver to the IK Solvers list and name it appropriately (eg. right arm solver)
-
Find the equivalent forearm bone and add an empty game object as a child and name it appropriately (eg. right arm effector)
- Move it to the end of the wrist of the character’s arm! (or the ankle for the leg)
-
Click on your solver and drag the effector into the effector slot and then press create target.
-
-
Now if you drag around the handle you’ll see that it moves our arm around nicely!
-
If it seems to bend the wrong way, check the “Flip” button
-
Do the same for all your other limbs!
-
-
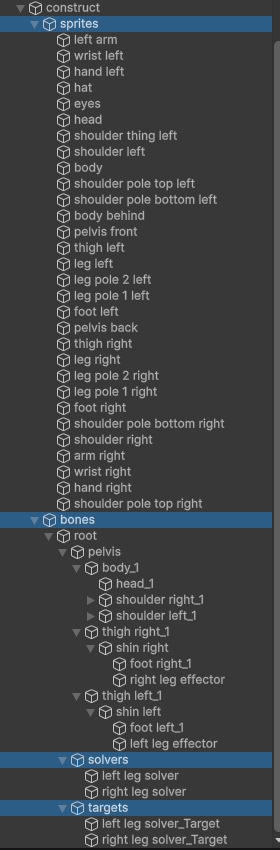
Organising all our nodes
-
Create an empty as a child of your main object and put all the sprites in it. Call it “Sprites”
-
Create another one called “Bones” and put the bones in it
-
As a child of your root bone, add another Empty and call it “Solvers” and parent the solvers to it
-
Do one more for the targets
-
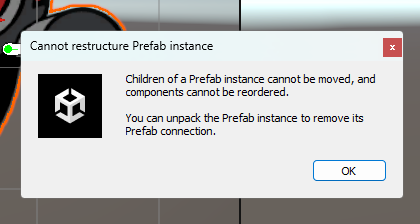
The below image demonstrates this, otherwise, ask Lauren for help if this makes no sense
- If you get an error like this, right click on the parent and press something along the lines of “unpack prefab completely”
-
-
Click back on your character and add an Animator Component (in the same place that we added the IK Manager 2D)
-
Go to our Animations folder and make a new folder for the character
-
Right click > Create > Animation > Animation Controller
- Name it after the character
-
Click back on the character, and drag the controller into the Controller field in the Animator Component
-
-
Collapse all your folders so youve got just the one character thing(?) in the hierarchy and drag it into the Prefabs folder, so the programming team can use it
-
You should be ready to start animating! Hopefully!
Animating
Once the rig is set up, and we have an Animator Component on our character, we are ready to animate it!
You can watch this video (from 6:20 onwards) if you need a better explanation than what I have written here !
-
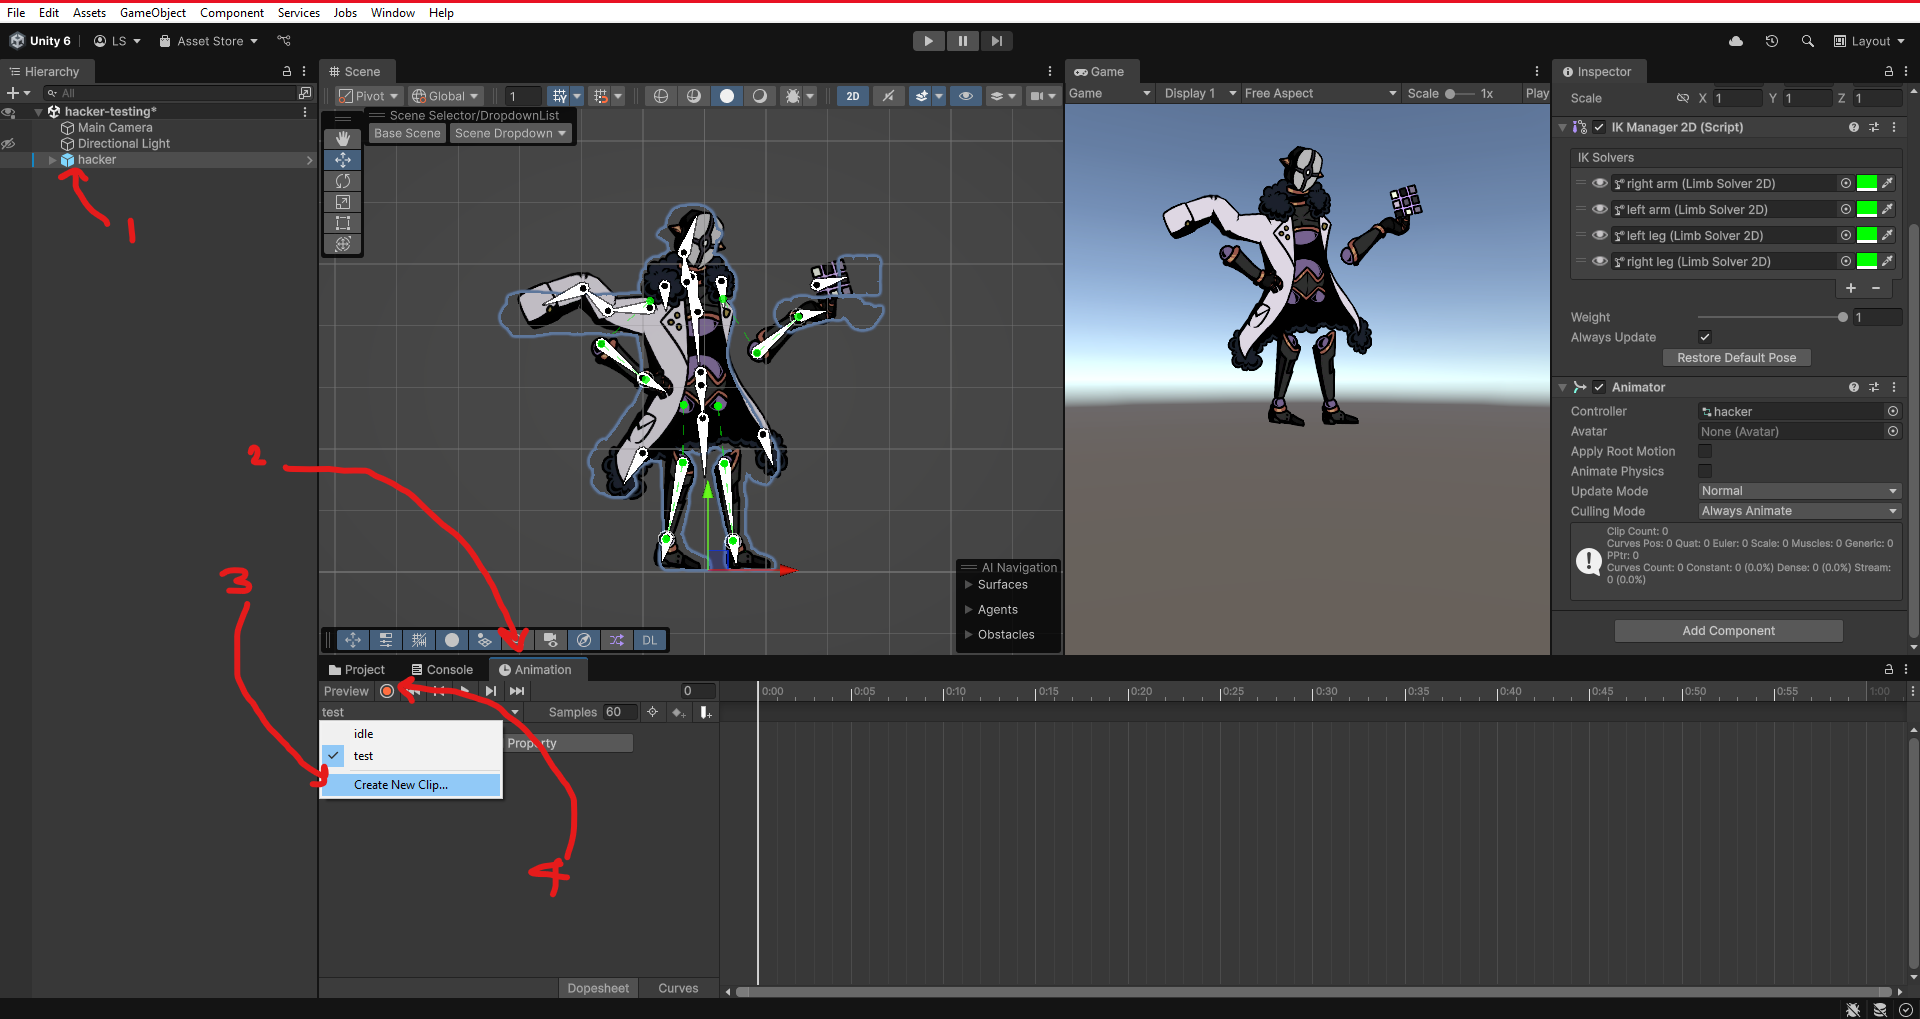
Click on the character in our scene hierarchy and click on the Animation tab.
-
(If you don’t see the Animation tab, click on Window > Animation > Animation in the context menu up the top)
-
If you’ve done any animating with a timeline before, this Animation window will look very familiar!
-
-
Create a new animation and title it appropriately
-
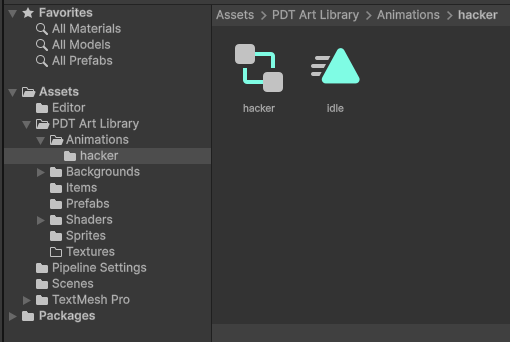
IMPORTANT: Save it into
Assets/PDT Art Library/ Animations/<character name> -
For example, here is the Animator Controller (hacker) and Idle Animation (idle) for Hacker
-
Click on the red record button
-
Start posing your bones!
-
Set the playerhead to a spot on the timeline and position the bones of the character. This will add a keyframe.
-
The positions, rotations and/or scales of the bones will be tweened between each keyframe.
-
If your animation needs to loop seamlessly, copy and paste your first keyframes to the end of the animation.
-
‘Auto’ vs ‘Clamped auto’
-
When you have an animation which loops, you might notice that your animation seems to slow to a stop between loops, making the start and end point obvious.
-
To make it more seamless, try clicking on the keyframe dot above all your beginning keyframes to highlight all the beginning keyframes for all your pieces. Then change it from Clamped auto to Auto. Do the same for your end keyframes.
-
However, sometimes you might want that slow-down feeling- for example, in the hacker idle animation, i wanted the swaying cloak to slow down between loops. So I changed the keyframes for the cloak pieces only back to Clamped auto, and left everything else on Auto.
-
If this doesn’t make any sense don’t worry about it, i’ll point it out when i see it - just try both Auto and Clamped Auto and see which one looks better for ya
-
Rearranging Layers
- See below for how to reorganise the layers!
Sprite Swapping
-
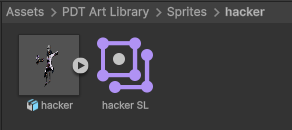
If one doesn’t already exist for the character, make a folder for them in the Sprites folder and move their sprite into it.
-
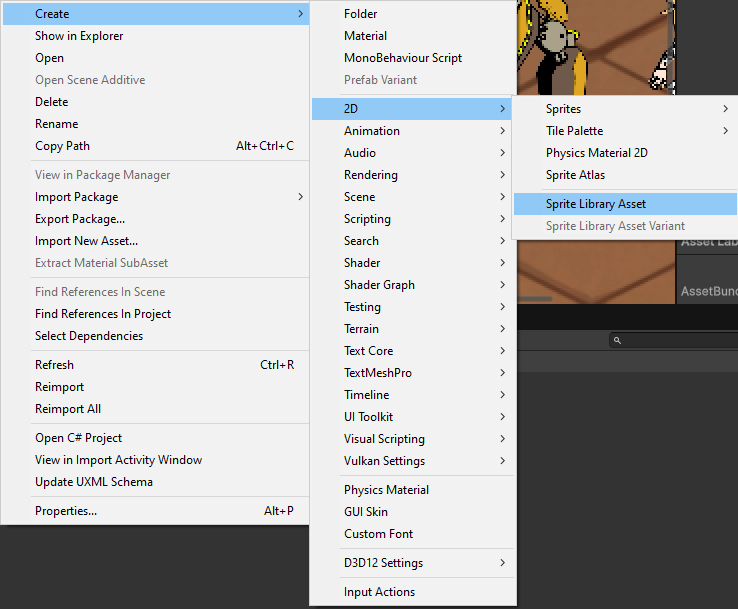
Then, create something called a Sprite Library Asset. We will edit it later.
Single Piece - eg. for hands
- Open up the .psd for our character and draw in the new piece that we need on a new folder. Make sure that it’s name is unique
-
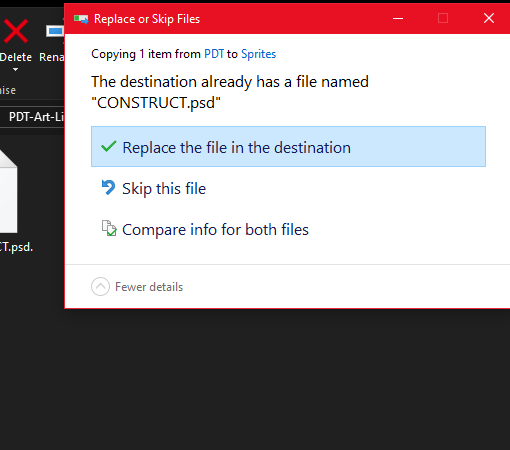
Save your psd and replace the old one with the new one (you can do this through your computer’s file explorer easily. Ask lauren if youre unsure)
-
Make sure you have the folder for this piece merged
-
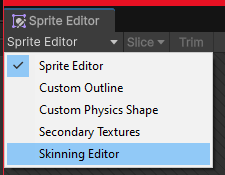
Open the Sprite Editor and go to the Skinning Editor
-
Find your new sprite and associate it with the same bone(s) as your old sprite. You will likely also need to weight paint the association in.
-
Save it and exit the skinning editor.
-
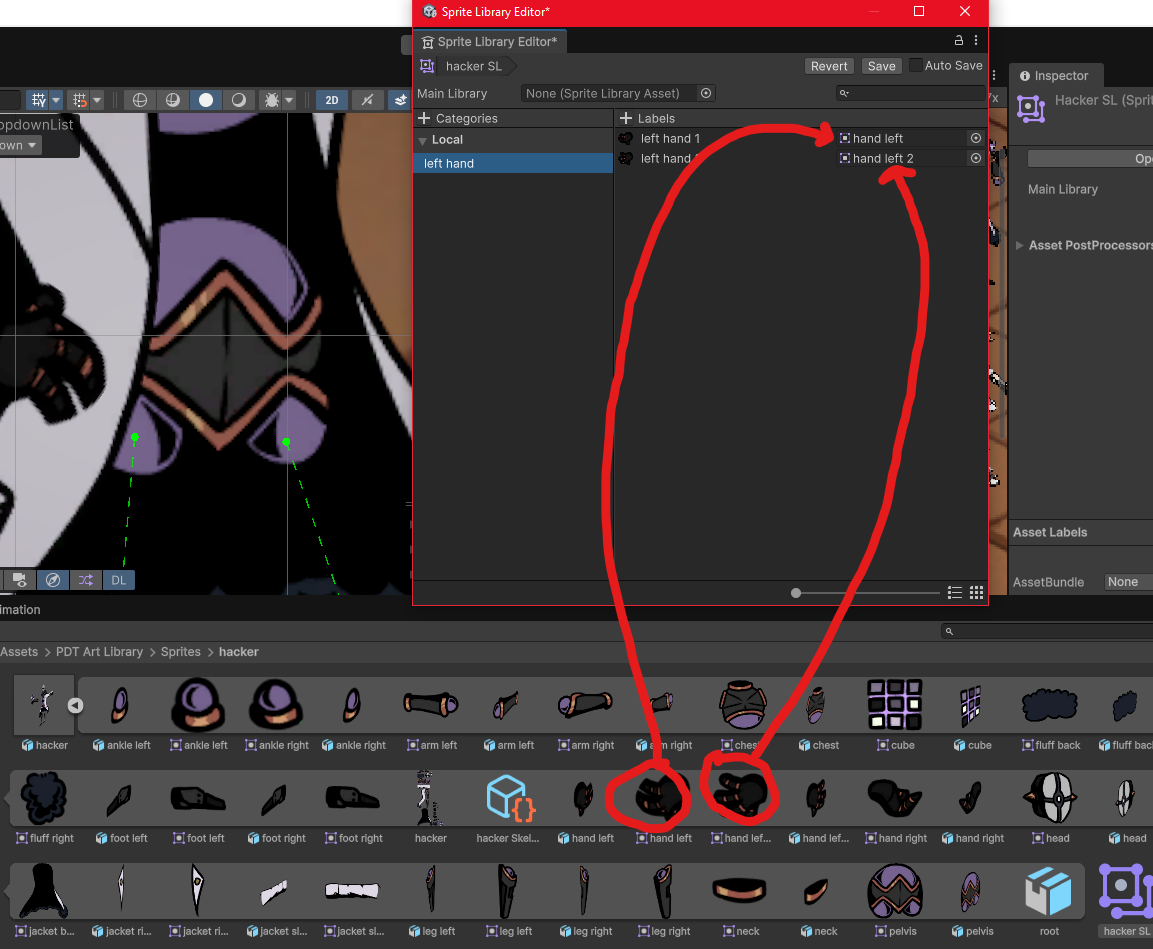
Click on the sprite library for our character and click the “Open in Sprite Library Editor” button
-
If it doesn’t already exist, create a category for the piece that you’ve drawn
-
When we eventually do sprite skins, we are going to create a category for every single sprite, but to save time, you can just do the necessary pieces for now.
-
(But if you want to, feel free to add one for every sprite… lmao)
-
-
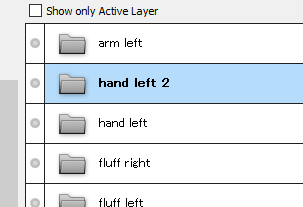
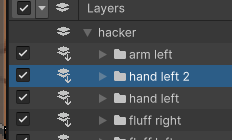
Add a label for each variation of the piece. Eg. ive got “left hand 1” as my original hand piece and “left hand 2” as my new one.
-
Hit save and close the Sprite Library window
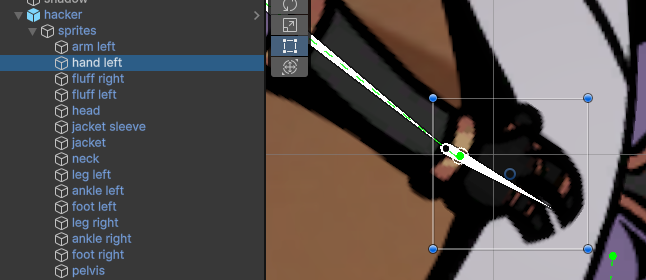
- In our scene hierarchy, go find the original sprite of the piece we want to replace (eg. im selecting the left hand)
-
Give it a Sprite Library Component and a Sprite Resolver component (if it doesn’t already have one)
-
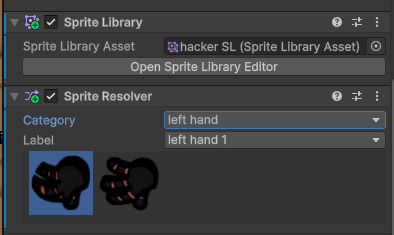
Drag the sprite library for our character into the Sprite Library Asset field
-
In the sprite resolver, select the category for our part and then you should see all variations appear!
-
Make sure you update the prefab!
Entire Character - eg. for character skins
- TBA…
Errors + how to fix
Adding errors from rigging and animating into here when I spot them.
- If, when setting up your rig, you notice that the bounding boxes are much larger than the actual sprite, it means you have stray pixels somewhere. You need to go back into your art program and erase this and reimport the sprite before you move on.
- Layers in wrong order?
-
Have you realised that a specific part should have actually been on top of another one? (eg. is the hand going behind the body when it should be in front?)
-
Reorder the layers in your art program and re-save the psd. Then replace the psd in your computer’s file explorer, with the new psd.
- Layers in wrong order (part 2)?
-
Only do this method if you need to adjust the layer orders during animation
- We want the default rig to have realistic layer sorting so that we dont need to manually adjust many layers for each animation.
-
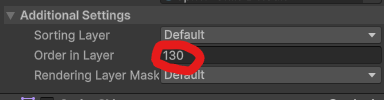
That being said, to adjust the layers, just change the “order in layer” property of the sprite
-
Please note that this will tween the value. Ie. if on the first frame it is layer 0, and on the 30th frame you set it to layer 100, it will increment this value between then (ie. on frame 15 it would be layer 50)
-
So be mindful where you put your keyframes
-
- “Ohno! I realised that I should have split up a certain sprite into multiple, what do I do?” OR “I realised that I need to edit this sprite and change its overall size and look”
-
This has happened to me when I’ve been working on both hacker and construct. It takes a bit of fiddling, but here’s what you need to do:
-
(Don’t worry, you don’t need to start the rigging again from scratch.)
-
Split up your sprite as you need to in your art program, and re-export the psd file.
-
Replace the psd in your computer’s file explorer with the new one
-

- Since you’ve made some new layers, you’ll need to remember to go to the Layer Management tab and tell Unity to merge them (remember to also click apply)
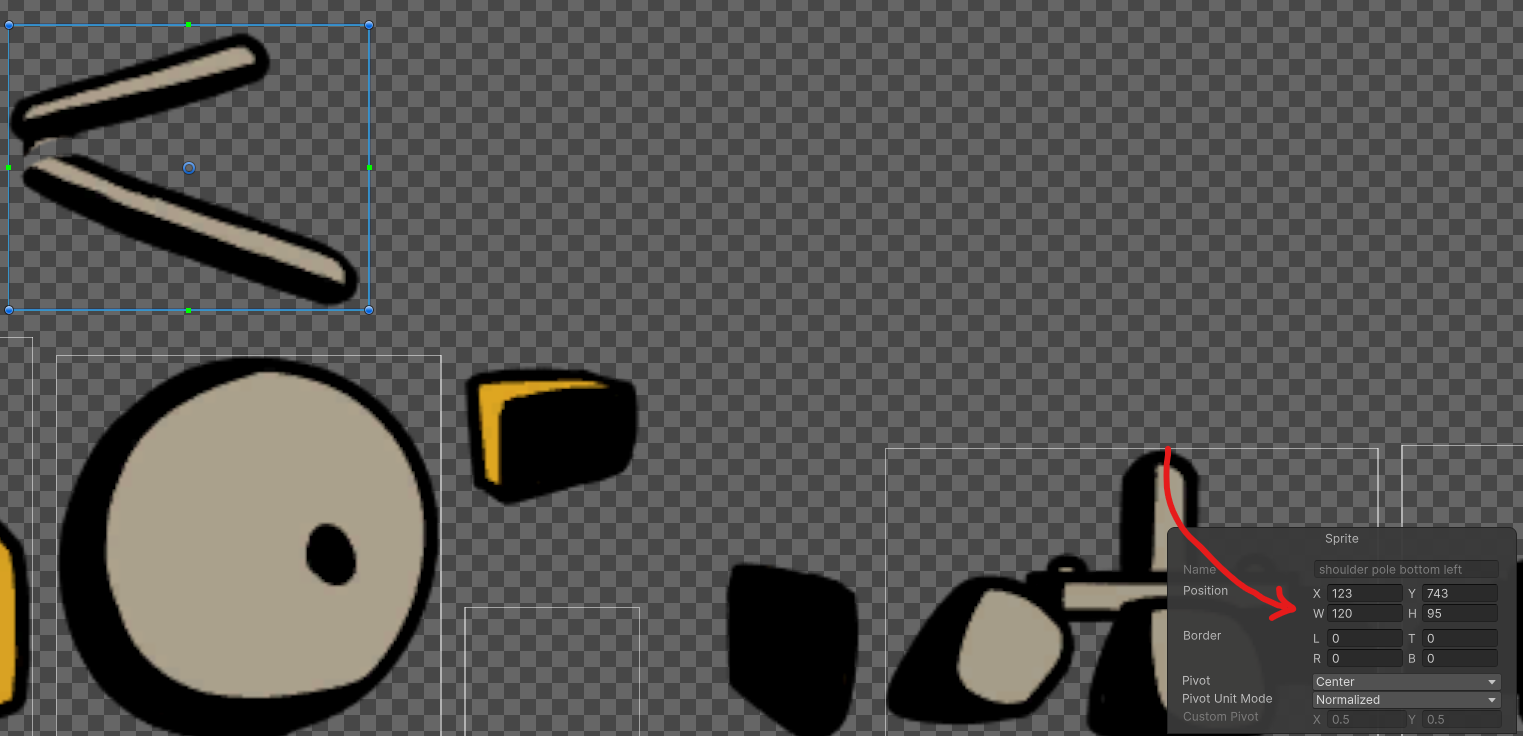
- When you open up the sprite editor again, you’ll probably notice that any changes you made have now caused some of our bounding boxes to be incorrect
- Click on this icon up here and unlock the “Position”
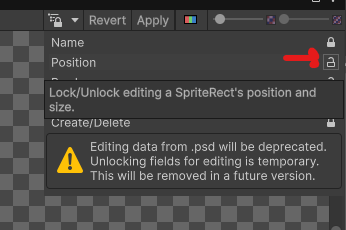
- Then click on one of your incorrect boxes and edit the Width and Height values so that it encompasses the sprite correctly.

Now go back to our skinning editor and press Auto Geometry > Generate For All Visible
- Now make sure you add back any missing bone influences for the sprites (the ones which dont show as being coloured by a bone)
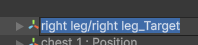
- If you edit the hierarchy of the object after animating, you may see this yellow text that says (Missing!)

-
Press F2 with this object selected, and rename it’s path.
-
In my example, I needed to rename this object to root/targets/right leg_Target, as this is where it sits in the hierarchy after i moved it.
Before
After
